

Fitting a boot release switch
A little background
Ford fitted the remote release feature in pre 86/87 "High Series" Fiesta's.
No-one knows exactly why they stopped fitting this in the later cars. One theory is that they were going to fit electric windows and use the centre console to house the switches. Doing this would leave no-where for the release switch to go.
The electric window theory is a possibility because Ford have two blanking panels fitted in ideal locations in the centre console - one switch each for driver and passenger, however those switch blanks are used for heated seat switches on some european models.
Other theories are cost and reliability problems, although the only known issue is a resistor replacement which generally doesnt rear it's head until the car is well beyond its intended lifespan. Cost shouldn't be a factor because they have a wiring loom going to the back of the car anyway and the switches were in production and not costly to make, however pennies saved here and there soon adds up.
Step 1: Finding the bits.
You'll need to find the following bits for this project:-
- A Genuine Ford tailgate release switch.
- A Genuine Ford Solenoid Operated Rear Latch/lock.
- A four pin relay
- Some good electrical wire, preferrable different coloured bits.
- A self tapping screw (if there's no earth point already available to piggy-back on to)
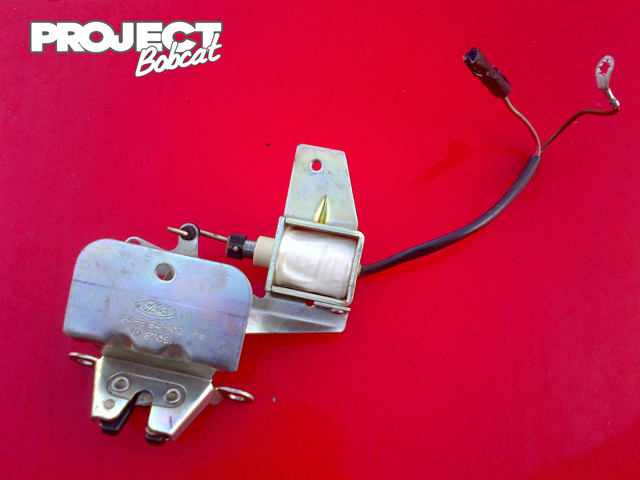
The tailgate release mechanism was only fitted to early Fiesta's, (pre D plate). You're most likely to find it in an early C Plate XR2 or Ghia. The switch is located in the centre console just behind the gear gater and infront of the handbrake. Prise it out with a flat blade and try and retain as much of the wiring as possible. The solenoid lock is fitted to these same Fiestas and can be accessed by opening the tailgate...
Take off the cardboard blanking panel from the back of the tailgate door.
Under this panel you'll see a lock barrel attached to a thin metal rod which in turn attaches to the locking mechanism.
Disconnect this rod. Now you need to remove the two latch retaining screws from the bottom of the tailgate door. Clearly visible each side of the latch mechanism. (There may be a third a little further up the inside).
Step 2: Fitting:
You need to remove and replace your existing rear latch mechanism with the solenoid number. Follow above instructions.
Remove a blanking panel from the centre console.
You'll need to attach the brown wire from the boot latch to EARTH or Ground (GND). Do this by using the self tapping screw to attach the wire to a nearby (recently punched :-) ) whole in your bodywork.
You will need to run cabling from the centre console to the boot. Not an easy task. The easiest way is probably to go forwards to the dash and then follow your speaker cables to the boot.
There are cable holes and rubber sleeves at the top inside corners of the tailgate shut. If you drop a piece of string down one and then attach it to your tailgate actuator wires you can use this to pull them up and through the hole.
Now poke the wires through a corresponding hole in the tailgate (via the rubber tube) and let gravity take them down to the bottom where the latch is.
Now wire-up the switch to the solenoid latch and the car's supply as shown below, you can then clip it into the hole in the center console.
Switch Wiring
| Switch Pin | Wire Colour | Function | Destination |
|---|---|---|---|
| 1 | GREY/YELLOW | Switch Illumination | Connect to any other Grey/Yellow wire or to any live source. |
| 2 | BROWN | Earth Contact | Connect to Earth, either vehicle bodywork or an existing Earth(black) lead. |
| 3 | GREEN/YELLOW | Relay Contact | Connect to Pin 30/51 on the Relay. |
| 4 | RED/YELLOW | Live | Connect to any live connection. i.e. The back of the Fag lighter. |
Relay Wiring
| Wire Colour | Function | Destination |
|---|---|---|
| Pin 87 | Solenoid Live Supply | Connect to the Red/Green wire on the latch solenoid. |
| Pin 85 | Earth Contact | Connect to any Earth point (see above). |
| Pin 86 | Live Relay Supply | Connect to your vehicles Live supply (see above). |
| Pin 30/51 | Switch Contact | Connect to corresponding colour wire on the Release Switch (see above). |
Step 3: Try it out.
Be careful with this new switch. The method of wiring described above allows you to open the boot whilst the engine is running. Don't lean on the switch or fiddle with it whilst driving! The original Ford wiring prevents this, but it's nice to be able to open it without switching off your engine, like when dropping off mates or picking them and the 'goods' up after a heist!