›
› Yellow Track Mk2 Fiesta XR2 Project
Yellow Track Mk2 Fiesta XR2 Project

Author: Robert Saunders | Photographer: Robert Saunders
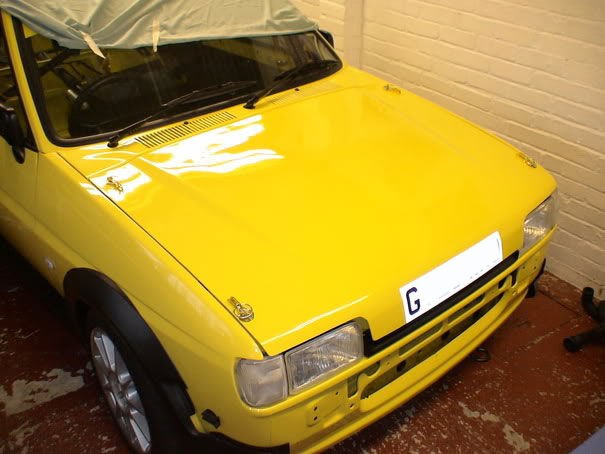
Zinc Yellow Zetec Rocker Cover and Bonnet
4th February 2006 • 08:51AM
I've got a few more small job's done since the last update. Not allot more to do now. Im still waiting to hear from Pro alloy about my rad. And I've finally got the car booked in to get the exhaust manifold down pipe's re-shaped, which is going in a couple of weekend's time.
So I thought it would be time to get the bonnet pin's re-fitted back in position, and the bonnet on. Now you may remember I went for a fiberglass skin to save weight. It's gone on well, and the fit is quite good, but not as good as a genuine Ford steel bonnet. But I expected this, and im also expecting it to flap about in the middle at the front even with the four pin's in each corner. Fitted the stick on number plate onto the bonnet like the old school Ford car's.
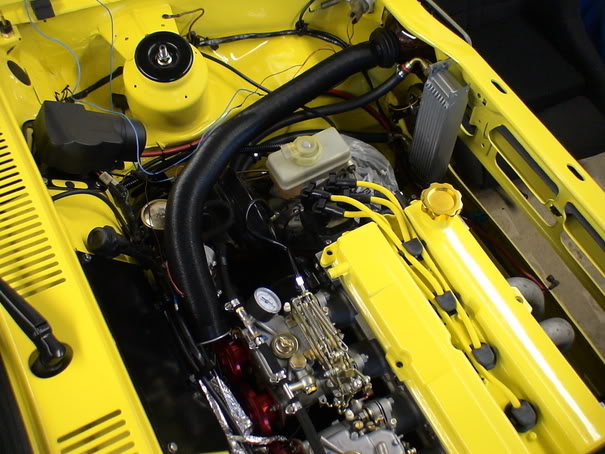
I thought I would place onto the engine the rocker cover cover I had painted by the bodyshop as at the same time as the shell. This is'nt bolted down as yet. This has been fitted with a new gold alloy oil filler cap. I also fitted the new Ford racing spark plug lead's to the coil pack, and im well pleased how well they match the cover.
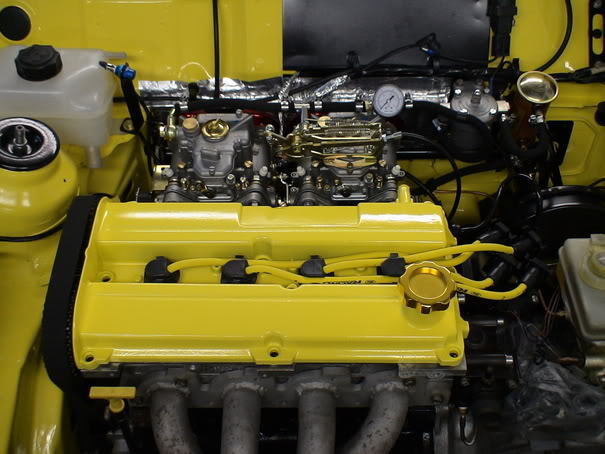
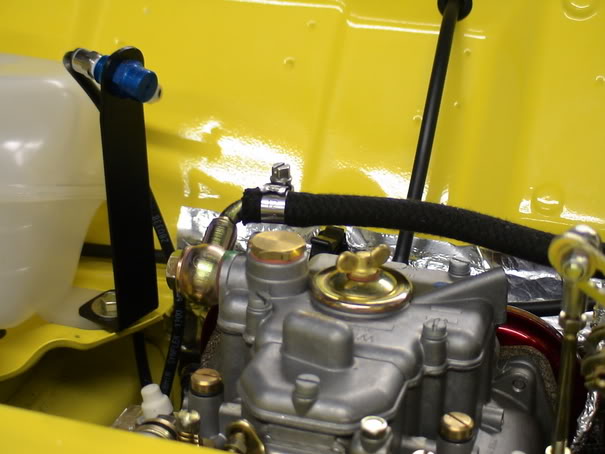
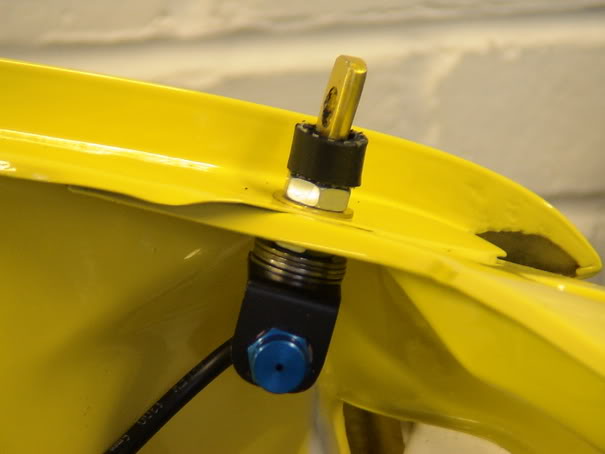
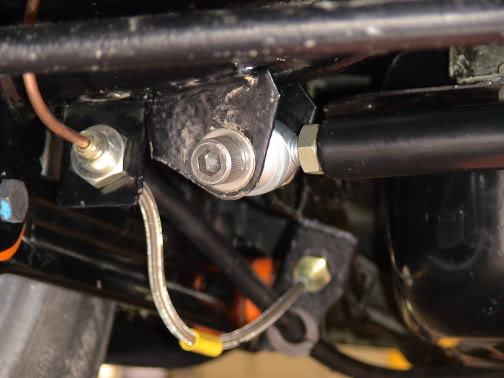
The small blue item on a black bracket near the header tank is one of the fire extinguisher jet's. I've positioned it in this area to cover the fuel side of the engine.
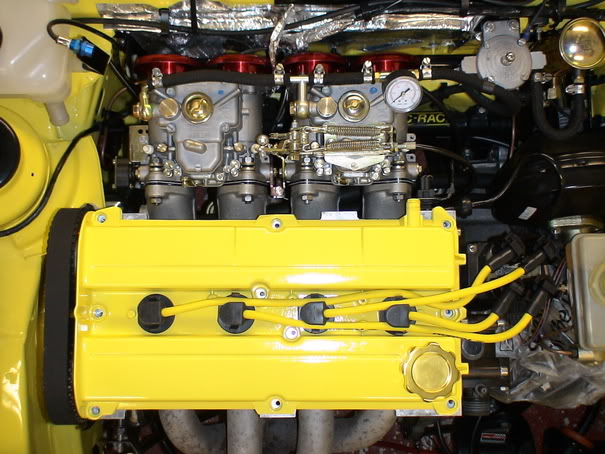
The other jet is positioned in the opposite corner, and is fixed into another bracket secured to thread of the bonnet pin in that corner. Im waiting on more of the pipework from lifeline as I didn't get enough in with the kit to finish it off.
Cold air feeds
8th February 2006 • 08:55AM
I got through from Lifeline, the couple of extra meter's of tubing I needed for my fire extinguisher. I've now fitted the extra bracket to hold the other jet in position. This has been fitted to the bottom of the bonnet pin in the opposite corner to the one fitted next to the header tank.
This is all finished now and im well pleased with the kit. The engine now has full coverage if I ever have the misfortune of a fire.
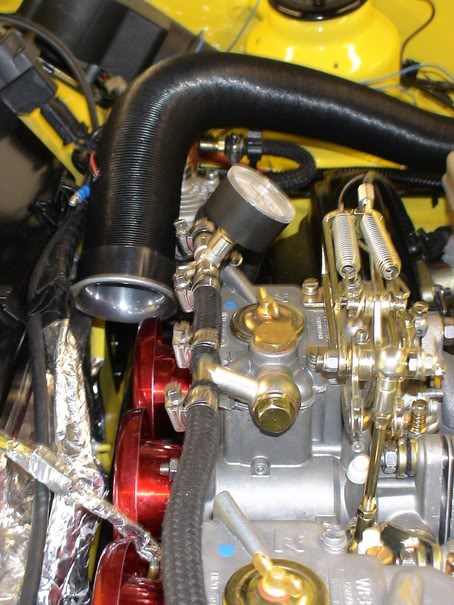
The other job i've been looking into is how to get more air to the Carb's. I have posted up picture's of the headlamp air scoop's that I had previously made up. These will have a 2" aluminium hose fitted on the back which run's round the engine bay to the filter's. Well I had the idea of fitting inside the pipe, a pair of small pc fan's, one at each end.
The fan's are square when I bought them, but I removed all the extra material from the outside so they are a nice push fit inside the tube.
I've fitted a spare DCOE alloy trumpet to the carb end. The tube has just been layed in position in the next picture's to see what it would look like, and the wiring need's tidying up still. But I think it will be ok.
Now I can guess most of you are thinking why?, as the fan's are not going to do much. But when I fitted them in place and wired them up to a battery I was quite suprised how much air is coming out the end. And this is not with the car moving as well.
The fan's were purchased from Maplin and are 50x50x10cm, code no: RY86 and priced at £3.96 each.
That's about it again. Next update will probably be the modified exhaust manifold when I get back from pipecraft in 2 weekend's time.
Engine bay sticker set and LED bulbs
13th February 2006 • 07:52AM
Hi all, just a small update for the last few day's.
I've got a few more item's for the car. The first was a part sticker set for the engine bay. I did'nt go for a complete set as some of it I would'nt use as im not using the cvh rocker or timming belt cover.

Very good quality item's. I got them from a chap called Robert Stickland. Nice chap, and can either sell you a complete kit or like he did for me just the sticker's you require. He also does them for many other Ford vehicle's.
I also ordered up a complete set of led bulb's from ultraleds.co.uk. Arrived in very quick time, and seem very good quality item's. Big thank's to Ben1 for advice on bulb's.
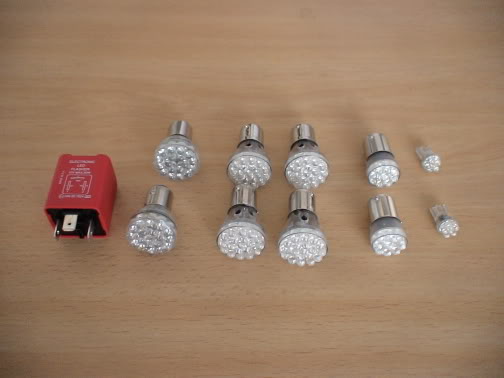
They are from left to right;
- Complete led flasher unit - stops fast flashing led indicator's, direct swap for the standard Ford flasher relay.
- (380) 15mm baynet 24 red led stop & tail ultra, custom version.
- (382 15mm baynet 25 anmber led indicator, new brighter version - 2 pair's.
- (382) 15mm bayonet white 9 led - for the reversing light's.
- (501) amber 6 led super bright, new brighter version - side repeater's.
I fitted the bulb's this afternoon in there holder's, and the indicator's were going mad as they were flashing so quickly . But once I changed the relay over it slowed them right down to almost the same speed as on original bulb's. It does say on the site that with the relay they will flash just slightly slower, which I tend to agree. At a later date I will change the dash light's to led's as well, probably amber to fit in with the yellow paint scheme.
Overall the bulb's are spot on, and look great with the smoked rear light's on the back. Only problem i've found is the reversing led bulb's. I ordered up white one's, and they seem to have sent blue. So I will have to contact them tomorrow, and get them sent back.
Alloy wheel refurb
16th February 2006 • 08:02AM
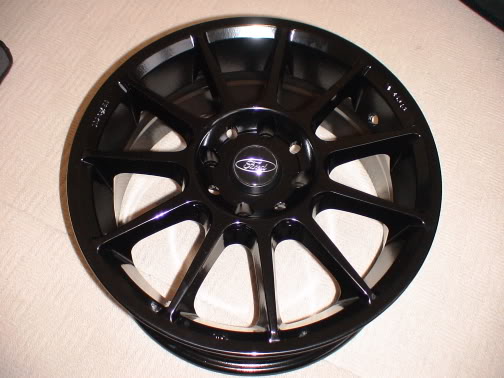
Some good new's concerning wheel's for this car. I have got back my set of Ace wheel's from the refurbisher's. Only took him two day's to do them as well.
I had them done in semi-gloss black which has come out just how I wanted them. There was some minor damage to the rim's that he has repaired. They went thru a acid bath with a light bead blast to get rid of any remaining muck. He then welded up the damage, and worked it back before coating them and going thru the oven.
When I picked them up this afternoon I was well pleased with the quality of the work he has done on them. You would think they were brand new alloy's. I also noticed today that cast on the wheel's is the weight which is 650kg. Is that a light or heavy for a alloy?
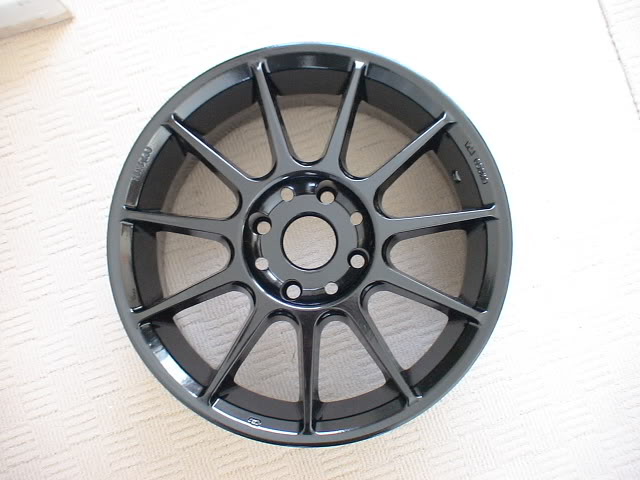
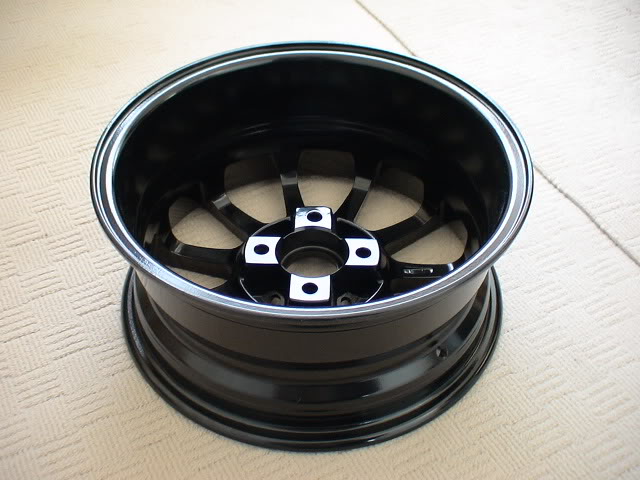
So I would highly recommend John at J.P.Polishing for refurbishment of wheel's, or any other shot blasting and powder coating work.
I told him that I will be posting up about the wheel's on this site, and would recommend him. So if your after some work, give him a ring for a quote. Im sure he will do you a deal. Although he is much cheaper than all the more well known place's already.
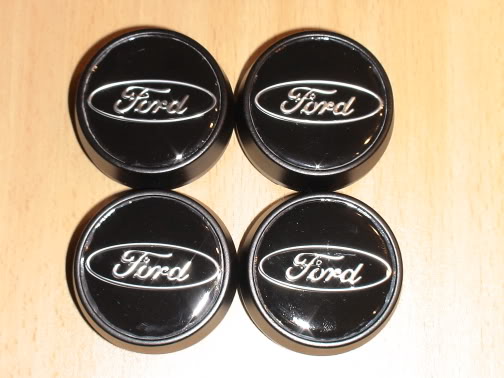
Yesterday I sprayed the center cap's satin black, and now need to make up a set of new emblem's to go on these. Im now thinking of going for a plain polished alloy disc.
I've now got to do some looking into getting a set of track day tyre's for these wheel's. But im sure no one does these style tyre's in a 45 profile. It may be a case of either go for a 50 profile, which may cause me arch to tyre problem's. Or maybe look into cut slick's, but unsure of what size's to go for as im sure they list them in imperial size's?
Underside View
18th February 2006 • 09:08AM
Thank's guy's again for the comment's. Still can't believe how nice the wheel's have come out.
Well yesterday I had to phone Pro alloy and find out what was happening with my rad, as I had'nt heard anything again. After a chat with Wayne's he's now promised to make a start on it next week. Not to good when I left all the info/size's before xmas, and it's almost the end of Feb now. So soon hopefully I will be getting a nice shiney new alloy rad.
Today the Fiesta saw the road for the first time in about 2yr's, even if it was being towed. Had it up to 45mph, and felt very stable with no unusual noise's from the suspension which pleased me. But plenty of other noise due to it being stripped out. I think I heard every stone that got flicked up in the arches, and all the different noise's the tyre's made on different road surface's.
The fella's at Pipecraft have started to modifiy the exhaust manifold, but as I was the last booked in he run out of time (closes as 12pm). I will be hopefully going back next saturday to get it finished. What he's done so far is coming along really well, with plenty of clearance past the sump.
While it was up on the lift, I quickly took a couple of picture's of the rear of the underside, as someone asked how it looked.
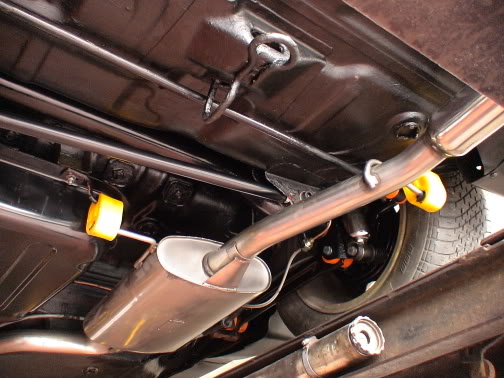
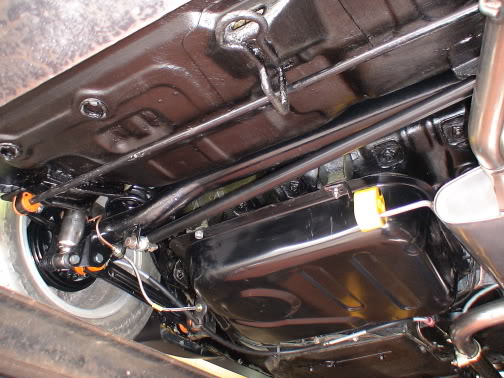
As you can see from these two picture's, it's all been renewed/uprated and powder coated. The floor pan has been coated in many layer's of underbody sealer, with added waxoil. It did'nt go for a painted surface as this is going to be used on the track, and I did'nt want to have to worry about stone's chipping the underside. Also the waxoil will hopefully prevent any rust from coming back.
Also in the picture's you can see my fully adjustable double rose jointed panhard bar that I am making up now. Make's it so easy to get the axle back into position after lowering, and prevent's tyre to arch contact.
As my mate's (thank's Kev) towing a-frame was un-suitable to tow the Fiesta, (the fiesta as to low). We had to use my towing pole, so I needed to be in the car to steer it. So I had to fit a seat belt. I now can't use a standard belt due to the rollcage leg being to close to the B-piller.
So I had to fit this.
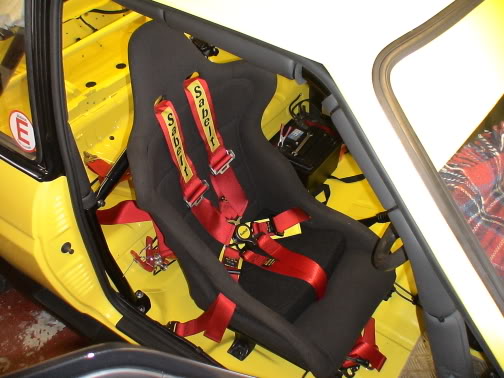
New Sabelt 6 point aircraft buckle style harness, 3" shoulder webbing and 2" side and crotch strap's. Really nice bit of kit, and will hold me securely down in the seat out on the track. Did feel a bit weird though today having it on while being towed. Quite a few people must have twisted neck's today as I went past, with allot of them doing double take's.
Centre Caps
24th February 2006 • 09:11AM
Just a very small update. As I have had the wheel's refurbed I thought I had better do something about the wheel center's. So I rubbed the cap's down and sprayed then satin black. I then purchased a set of new emblem's of ebay. I had to slightly reduce the diameter of them to fit in the recess of the cap's.
But I think the finished item's look really good, and suit the wheel's. Tomorrow the car is going back to Pipecraft to get the exhaust manifold finished. Picture's to follow.
Exhaust manifold and oil catch tank
25th February 2006 • 07:05AM
Today I had the exhaust manifold finished. Done a quality job, and now have good clearance thru the cutout in the sump and still with available space to get the starter in and out.
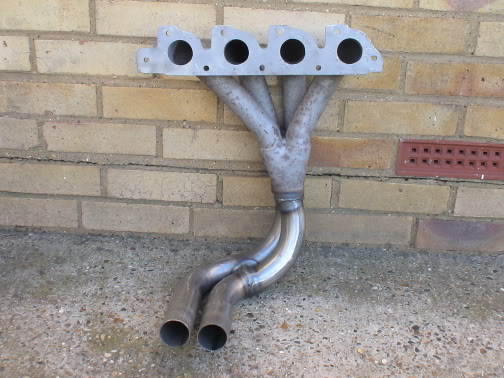
Now I need to spray the manifold in heat proof paint, and then cover it in exhaust wrap. I am also planning now on covering the starter motor in heat proof material, due to the closeness to the manifold. Hopefully this will keep the heat from cooking it.
I've also now finished making up my oil catch tank, it just need's powder coating satin black.
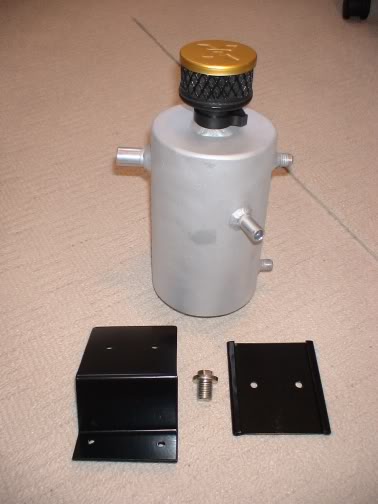
I bought the tank 2nd hand with the idea of changing it to suit my engine requirement's. I cut of the two original hose connector's, and fitted two new one's in the correct place's. Then fitted two screw fitting's on the side so I can fit two elbow's with a section of clear tube so I can see the level in the tank. I then added a boss on top for the gold Pipercross breather filter, and then another boss on the bottom with a sump plug so I can drain the fluid out.
The bit's in front of it are the bracket's. The one on the right has a slot either side so the tank slide's into it. Then that is secured to the bracket on the left which is then bolted to a available area in the bay. The only area i've got free now is were the support bracket used to be for the battery tray, so the tank will have to go there. Picture to follow once it's powder coated and fitted/plumbed in.
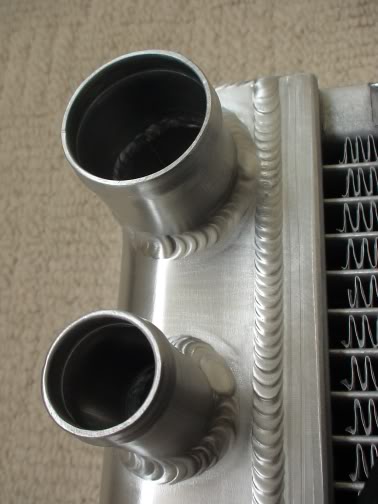
Pro alloy Fiesta radiator
10th March 2006 • 07:10AM
I phoned Wayne at Pro alloy Tuesday to see how my rad was coming along, or not as the case maybe. But was pleasantly suprised when he said he would have it finished for me Thrusday, if I wanted to pop up and get it.
So I got up extra early this morning, and had a drive up to Haverhill. Now to say I was pleased with the finished rad would be a understatment as it's stunning. The quality of the build is excellent, and has been made to my exact measurement / requirement's I left with them. Make's it seem worth while waiting almost 3 month's for now.
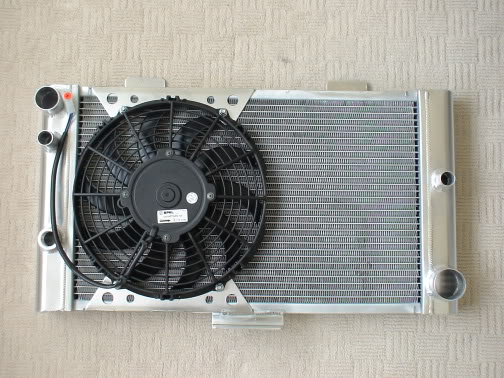
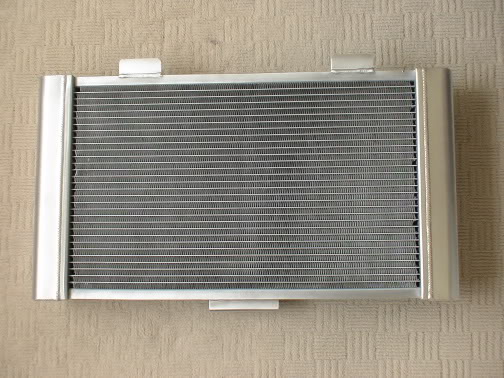
The outside dimension's of the rad are; Width - 600mm, Height - 323mm, Depth - 40mm.
The hose connector's on the rad have been made to match the size of the connector's on the zetec engine, (water pump, thermostate housing etc). This mean's I dont have to use any reducer's in my custom hose's that I will have to order once the rad's fitted.
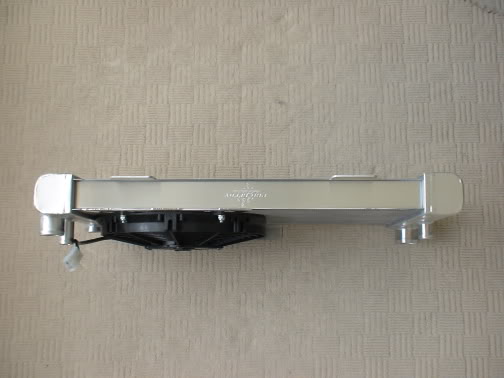
The rad has been fitted with a slimline 11" Spal fan onto bracket's welded to the rad. This will be connected up to a standard Ford fan switch which screw's into the lower section of the return side of the rad. Wayne did say that allot of people use a cossie switch, as they come on sooner and dont stay on as long. I will use a standard XR2 switch, and see how it work's with that first.
I will need to drill my own fixing hole's in the bracket's on the rad. One of the top bracket's will use a original fixing point on the inside of the front valance. The other top bracket will require a position drilled in the bodywork, and again two position's will be required drilling into the top of the front crossmember.
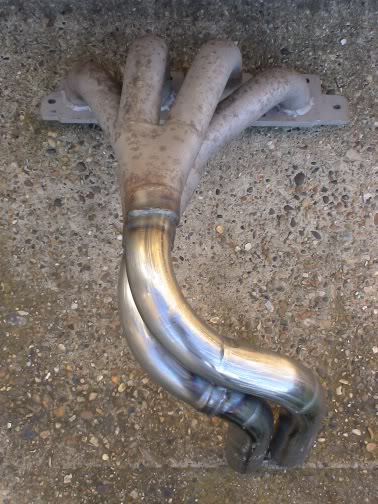
I've also now finished the exhaust manifold. I run out of exhaust wrap and am waiting on another roll to be delivered, which should be anyday now. I've also welded a boss on the side of one pair of down pipe's, so a Lamba sensor can be fitted. I purchased a boss kit which come's with a blanking plug so the sensor does'nt have to be left in the side of the manifold.The omex managment I will be using does'nt require the Lamba, but it will be usefull for engine tuner's setting the engine up.
Picture's will follow shortly as I fit the above item's in the next few day's. I've booked next week of work to get as much done as possible, as there is'nt much left to do. Im now going to try my hardest to get it finished for the end of April, as i've got a goal to try and meet now which is a certain Fiesta thrash which is being organised for the first part of May.
But this depend's really on if I can get it booked in to be setup in time, and nothing on the car let's me down at the last minute.
Add a Comment
Page Last Updated: Monday 18th of June 2018

