

Replacing the Mk2 Fiesta low spec dashboard with a high spec version.
One of the most popular upgrades for any low spec Mk2 Ford Fiesta is to replace the dash with the nicer version from a high spec car. This guide applies to UK right hand drive vehicles and details how to do it, including how to adapt the wiring to power the new instrument panel.
Finding a dashboard
The high spec dashboard was available in three main colours, grey (shadow), blue (bluestone) or brown, the most common (and easy to find) choice is the grey version.
The chances of finding a Mk2 in a breakers yard are decreasing by the day so your best bet is finding a dashboard for sale on a forum or Facebook group. Cars such as the later L (after 1986), or any Ghia and XR2 came with the high spec dashboard as standard. Its improvements over the low spec version include a glove box with closing door, 3 speed heater controls, a mounting hole for a radio and four way speaker control joystick, central heater vents and a larger instrument cluster with either rev counter or analog clock (L models), and a handbrake warning light.
Removing the high spec Fiesta dashboard
Unless you are buying a dashboard that has already been removed from a high spec dash, then you will need to carefully dismantle the dash and instrument cluster from a donor car.
Start by removing the steering wheel, there's a 22mm nut hiding underneath a cover. If the car has an XR2 steering wheel then use a flat screwdriver to prize out the round centre cap, L and Ghia models have a larger centre section that comes away a little easier. The nut underneath is usually pretty tight so use a decent length bracket or breaker bar to get it undone.
Next rmeove the steering column shroud, there is one screw in the upper section, and three in the lower. One sits behind the bonnet latch lever, so you'll need to pull it downwards to get access.
Next are the wiper stalks, held on each side by two small crosshead bolts per stalk, placed bottom and top. Carefully squeeze the release clips on each of the wiring harnesses and remove to create maximum clearance.
Remove the switches that sit in the panel to the right (UK cars) of the instrument cluster, they may need a flat screwdriver to ease them out. The switch holders are prone to becoming very brittle, so take your time. You can disconnect each swithc from the wiring loom, each has different locating pin so they will only plug back in to the correctly coloured loom plug.
Next remove the three heater controls, these simply pull towards you with a little force.
[To be continued]
Removing the low spec dash dashboard
To remove your existing low spec dashboard, you will need to start by removing the steering wheel. The wheel can be removed by prizing out the centre cap and then undoing the nyloc nut that is hidden underneath it. You will find it useful to use a long breaker bar to undo this bolt whilst holding the steering wheel firmly as it's pretty tight. Once the nut has been removed, grab the steering wheel with both hands and pull it sharply towards you to release. If you smack yourself in the face then marvel at your own strength for a few minutes and carry on. The next step is to remove the steering column shroud covers. The top part is attached with one philips screw, and the lower with 3 screws. You will have to pull the bonnet release lever to allow the lower half of the shroud to wiggle free.
With the column shrouds removed you can access the four dark grey screws holding in the indicator stalks. The cables unclip if needed by squeezing top and bottom, although it should be possible to ffed them through the dashboard without doing so.
With the steering bits out of the way you can tackle the black 'surround' around the main console. You'll need to pull off the heater control knobs and pull the rear heater and wiper switches out of their holes. The heater selection switch will have to be disconnected, along with the digital clock (if fitted).
[To be continued]
Now remove the Phillips screws from the four corners of the instrument cluster and pull the cluster forward. You need to unclip the speedo cable umbilicle from the rear which is usually very tight. Applying pressure to the two sides of the white clip allow you to release it, but access is poor and you usually end up with some scraped knuckles. Next remove the cables from the heater controls, taking care to mark which one is which for future reference.
The main dash carcass comes next, with six large crosshead screws to remove. Two are hidden under covers between the dash and widnscreen, these will need prizing up carefully with a flat screwdriver. Two more screws are located at the sides, and a futher two at the bottom sides. Sometimes the final two are also hidden under plastic covers, which also need to be prized out. These covers didnt survive for long during the cars production span, and are only found on early Mk2s. With these removed, the dash can now be lifted out of the car.
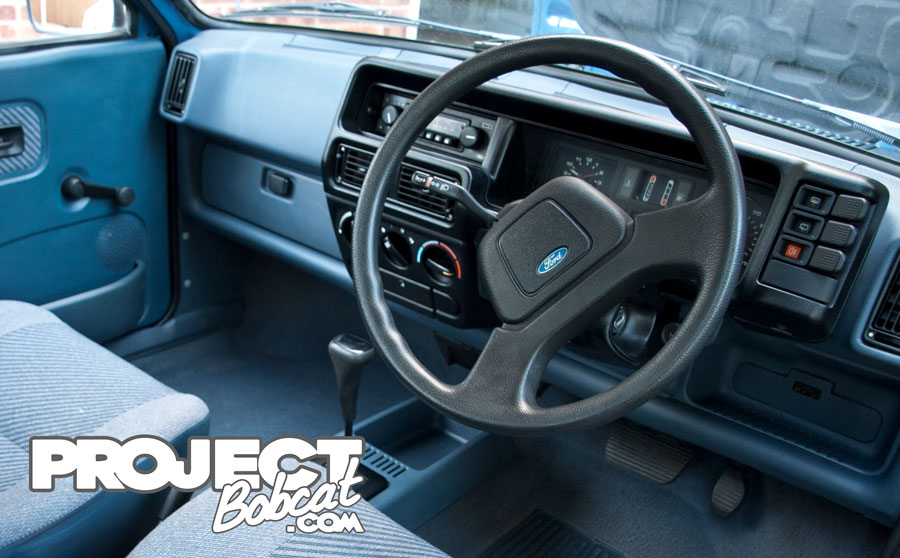
Congratulations, you've successfully removed the dashboard! Admire your new 'Rally style' Fiesta.
Upgrading the heater unit
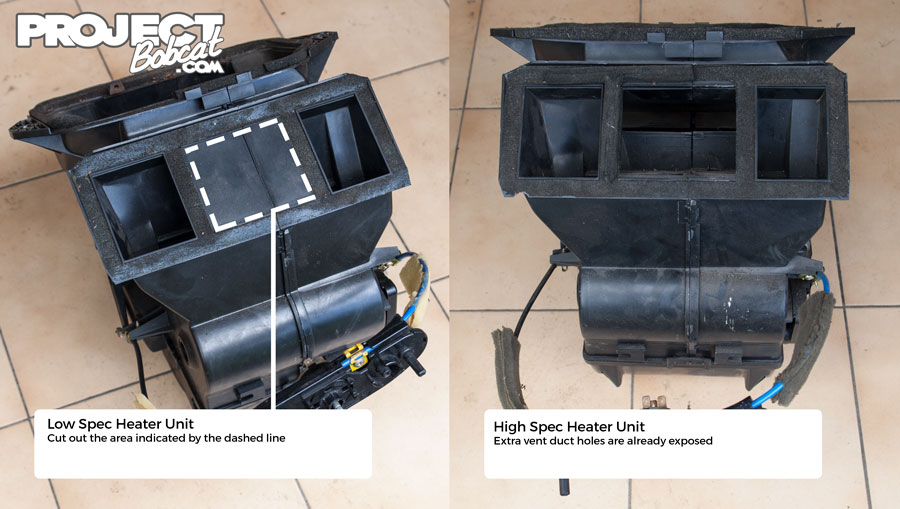
There are two main heater units types fitted across the Mk1/Mk2 range, however a part number revision was made in 1987. The high spec units are almost identical, except have a piece of plastic missing which allows air to be output to four vents rather than two.
| Part Number | Spec Level | Finis |
|---|---|---|
| 77FG 18478 DA | Low Spec | 6051136 |
| 77FG 18478 EA | High Spec | 6051137 |
| 87FG 18478 AA | Low Spec | |
| 87FG 18478 BA | High Spec |
Even though the heater boxes are the same, the heater controls that attach to the dash do differ between dashboard versions, so make sure you have the correct ones and their associated cables and wiring
You dont necessarily have to replace your heater box with a high spec version, but if you still want the additional vents to be functional you can still use your low spec heater box anyway. Carefully removing a square of plastic from your low spec box allows it to perform in the same way as a high spec version, please refer to the diagram below for the area to cut, which can easily be removed with a dremel or sharp/knife/ hacksaw blade (think safety first please!).
Wiring the instrument Cluster
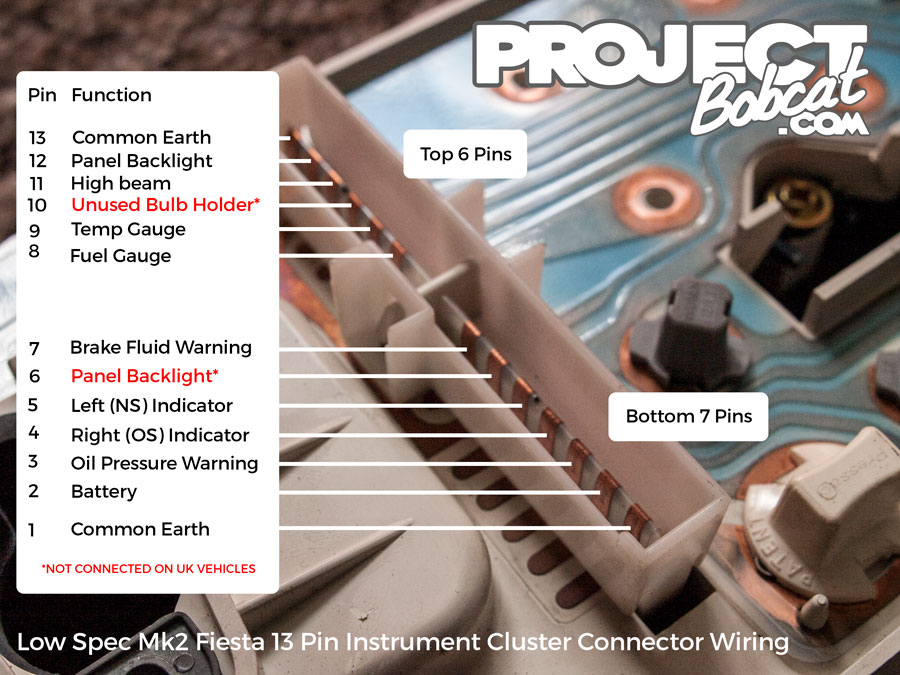
Low Spec Fiesta Instrument Panel
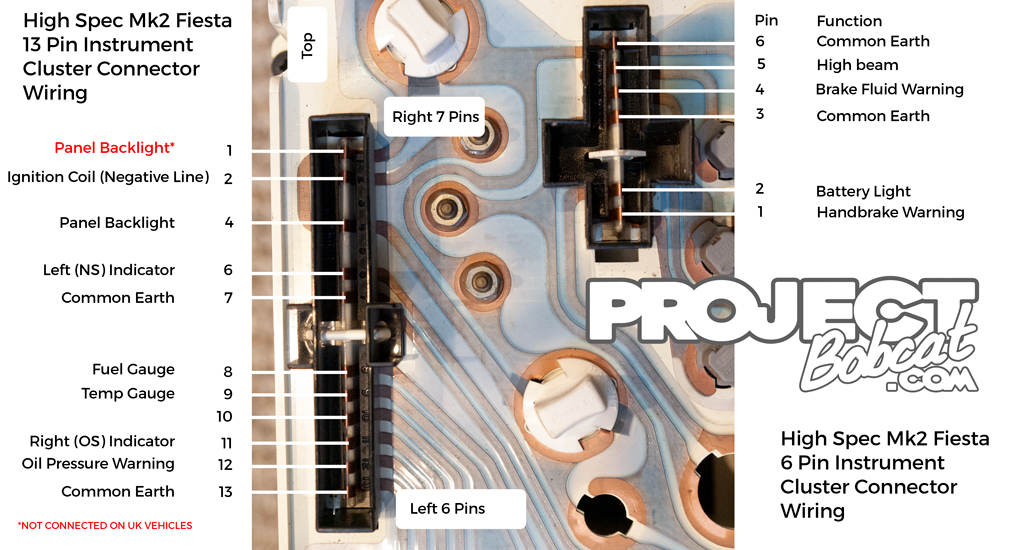
High Spec Fiesta Instrument Panel
Connecting wires from a low spec connector to a high spec
To convert your low spec loom to run a high spec dash, you will need to replace the single 13 pin connector with the high spec 13 and 6 pin connectors. Make sure that you use soldered connections and insulate them properly to prevent possible fires.
The table below shows which pins on the high spec connectors, you should connect your low spec versions to. For example Pin 1 on the low spec connector should be split into two with one wire feeding Pin 13 on the high spec large connector, and one wire feeding pin 3 on the smaller of the two connectors.
| Low Spec Plug | High Spec Large Plug | High Spec Small Plug |
|---|---|---|
| Pin 1 | Pin 13 | Pin 3 |
| Pin 2 | Pin 2 | |
| Pin 3 | Pin 12 | |
| Pin 4 | Pin 11 | |
| Pin 5 | Pin 6 | |
| Pin 6 | ||
| Pin 7 | Pin 4 | |
| Pin 8 | Pin 8 | |
| Pin 9 | Pin 9 | |
| Pin 10 | ||
| Pin 11 | Pin 5 | |
| Pin 12 | Pin 4 | |
| Pin 13 | Pin 7 & Pin 10 | Pin 6 |
The low spec dash doesn't have a rev counter or handbrake warning lamp, so you will need to wire those two items up using your own wire to the pins on the high spec dash listed below. Please not that the high spec dash from L models includes a clock so the rev counter wiring doesnt apply in this case.
| Extra Functions | High Spec Large Plug | High Spec Small Plug |
|---|---|---|
| Ignition Coil | Pin 2 (if rev counter fitted) | |
| Handbrake Warning | Pin 1 |