

Adding the intermittent windscreen wiper function to your Mk2 Fiesta
Intermittent wipers work by charging a capacitor which reaches a certain voltage and then discharges, activating one sweep of the windscreen wiper motor. High spec Mk2 Fiesta's (the XR2 and Ghia) came fitted with an intermittent windscreen wiper function as standard and it can be retrofitted to lower spec vehicles without too much difficulty.
As with all of our guides, we can't take any responsibility for any damage you may cause to your vehicle whilst following this guide so if in doubt, speak to a qualified auto electrician first.
To upgrade your wiper functions you will need the following 3 items:
- Suitable automotive wire.
- A wiper/headlight stalk from a high spec fiesta that already has intermittent wipe
- The tall red relay from the fusebox with connections marked 54, 31B2 31B1 and 31 (check your fusebox before going out to buy one as some vehicles already have this fitted)
- Appropriate wiring connectors
Finding the intermittent wipe parts that you need
First of all getting hold of the wiring is easy, if you dont already own any suitable cable then it's readily available from any motorfactor or car accessory shop, you're looking for ordinary single core pvc cable, something like 17.5 amp, 2mm cable should be more than sufficent.
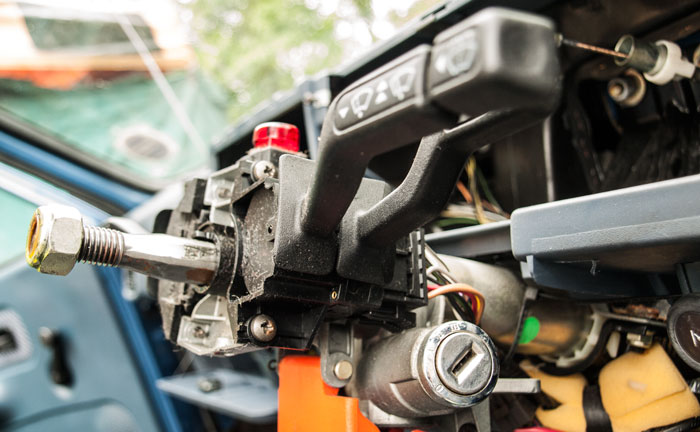
Next to find the fiesta parts, there aren't many in the scrapyards these days so your best bet is somewhere like a fiesta forum, eBay or a fiesta related Facebook group. To check the stalk is the correct one, push the wiper stalk down, if you've got the right one it'll stay down and not spring back up. If you are removing it from a vehicle yourself then you will need to remove both the top and bottom of the steering column surround (one screw holding the top, three holding the bottom), then unscrew the two grey screws holding the switch to the column and unclip the wiring from the back.
To remove the relay from the car you will need to find the fusebox (behind the flap to the bottom right of the dash and undo the 3 fusebox retaining bolts, this will allow it to be unhooked and then by removing the under dash carpet, you can gain access to the relay cage on top of it. The large red relay can then be simply pulled out, check it carefully and make sure the right terminal numbers are printed on it.
Fitting the wiper stalk
Remove your steering column surround in the same way as described above and remove/disconnect the old switch. You will see that there are two empty holes in the multi-plug connector, use your automotive wire to make two lengths, approximately half a metre in length. Next strip back the ends and push these through the holes in the connector, you should be able to push these in so that they make a contact with the switch terminals. Following the route of the existing wires, feed the other ends of the cables and down to the fusebox. Feed the wires to the spare socket in the cage, strip the ends and prepare one additional wire approximately 1 metre in length, then connect the wires as follows:
- 31B2 - goes to 31B on your wiper motor
- 31B1 - goes to 31B1 on the new wiper stalk
- 54 - goes to 53-2 on the new wiper stalk
- 31 - is a ground, the spare socket in the relay holder should already have a connector in it for this.
Ideally proper connectors should be used to connect the cables to the relay/wiper stalk plug to stop them falling out which could potentailly cause an electrical short circuit and even fire but for testing purposes you dont need to do this immediately.
The wire going from 31B2 should be pushed through the large rubber grommet into the engine bay, you can either use the speedo cable grommet or the larger main wiring loom grommet. This wire needs to be connected to terminal 31B on the wiper motor (brown/white cabling) wire, again a proper soldered and heat shrunk connection is the best way to make it permanent.
That's it, if youve done everything correctly then it should now work, if not check all your connections.