"Saving Ford's hot hatch from becoming a fridge"
A resource site for owners of the Mk1 & 2 Fiesta

Project Bobcat Ford Fiesta resource site

Mk1 Ford Fiesta RWD Cosworth Project

Andy Smith

Author: Andy Smith | Photographer: Andy Smith

A Mk1 Fiesta 1.1L goes under the knife

Well where do I start, I have had the car for about 6 months or so, it was a perfect running Ford Fiesta Mk1 1.1L to start with but I wanted a project to do, the first idea was to go duratec and FWD but then the more I thought about I wanted rear wheel drive again so that was decided. This project will take a bit of time due to money and a lack of time to work on it but I'll keep the thread updated as I go, I've had a bit of a head start on the work as I thought you'd like to see something so here we go...

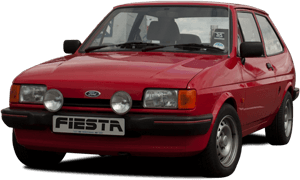
The car when I first bought it...

Then it was stripped and sent to the sand blasters, i had the engine bay and the underneath shot blasted and this is what came back.

sandblasted Mk1 fiesta body shell sandblasted mk1 fiesta engine bay sandblasted and primered engine bay mk1 fiesta pitted inner wing mk1 fiesta underside after sandblasting mk1 fiesta shell on a trolley mk1 fiesta sill rust hole

Now there was a few bits of rot that needed attention, 2 holes on the backs of the sills, and the usual inner wings . I'd like to point out at this stage i've never done any welding in my life so i'm hoping to learn on the way. I thought I'd start on the areas that wont really be seen ie the sills, I cut the holes of rust out a bit and then plated over them, knocked the edges in a bit and skimmed over them, the welding wasn't the prettiest so i didnt photo any action shots. Now the welder is set up it should be easier from now on.

Then i decided to plate over where the reverse light was.

mk1 fiesta reversing light removed

Now the welder is properly set up and my welding is getting neater i started on the inner wings. I bought a repair panel for the O/S but had to make the panel for the N/S, I'm really happy with the way they came out.

mk1 fiesta inner wing rust repair

Action Shot

So with those done now I needed to get rid of the filler cap as the tank will be in the boot, I kept the old bit incase I wanted to put it in somewhere else.

Thought i'd try the axle in the back to see how it measured up, its a capri atlas axle and suprisingly was about the right size. The diff hits the boot floor so that was cut out.

I'm collecting parts to start the hard stuff, i.e RWD, I've got the axle, I need to buy a 4 link kit, watts linkage, gearbox. i've been given a std crossmember to use as a dummy part so i'm nearly there. A mate of mine owns a fabrication company so we're going to take the car over there one weekend so we can fabricate the tunnels etc. Oh almost forgot here.s the engine, its allegedly a 2.1 Normally aspirated cosworth bottom end, using Hart 420R Pistons, ultra light steel fly wheel, Titan Twin Plate paddle clutch, it cam with all new shells, rings, bolts to give it a freshen up. Now i'm saving up for the expensive part! The head!

I'm hoping for approx 220bhp out the engine which i think will be achievable, turbo cosworth will of course be quicker but the sound of carbs at 8-9000 rpm! well worth sacrificing a few bhp!

The shell fabrication begins

Ok, so we've got starting on the shell fabrication firstly we braced the shell to keep it straight while we were cutting it around.

Trimmed a little off the inner wings

I'm trying to keep the original shape of the inner wings as i dint like it when they look all boxey, also keeping as much space as i can in the bay.

A rough drawing of what we're thinking of doing:

Then we've attached a folded plate to fill the gap between the inner wing and 2 to start the shape of the new chassis rails which will tie in the orginal ones, it also gives extra strength to the box section.

Then a couple of plates to fill in the holes in the inner wings.

Then to give that extra bit of stregnth we added some tie bands onto the inner arch/bulkhead area

It all needs tidying up and grinding back, but i'm not building a concours car i want it to be strong and last, i will look better once its seamsealed.

Thats where we got up to last night, a couple more filling in plates and wedging and thats the stregnth done in the front. next is to make the crossmember brackets and make the new strut tops. Just lastly this is how we've been moving the car about.

Chassis Plans

The box section is 40mm x 80mm, we are making a chassis that ties in off the angled bit at the back to run down the whole car and then tied into the 4 link boxes at the back, similar to a Mk2 Escort I would think. I'm very lucky to have a good mate thats a fabricator and owns his own workshop with all the tools we could need, without his help i wouldnt be attempting this, and his welding is top quality.

Plenty of Welding

Small update, the fronts coming along nicely we've put some stregnthening into where the box section joins the crossmember.

Theres a couple of bits to finish off on the front but we started doing the axle as a bit of a change.

We've starting making the rear turrets.

Cut a couple of holes

And thats where we've got up to now, left to do on the rear is shape the turrets to fit and then weld on, bolt on the watts linkage and make the brackets to suit. Then back to finishing off the front and starting to make the chassis up to run down the car.

Strut tops and crossmember

Done a little bit over the weekend, mainly the strut tops and mounting the crossmember here's the pics.

The next job is to make the engine mounts and sit the engine and gearbox in and fabricate the tunnel.

The major welding continues

Update time... I wasnt happy with the rear turret and suspension so i made a small cut and going to start again.

With all of that gone i had a blank canvass to start again first we made the tubs, these follow the original line of the car.

Then we cut down the original strut tops we made and then put on the bits off the original strut tops.

Now we've made the middle bit of floor and axle cover.

Theres alot of welding to do on the back still, everything is pretty much tacked in there, need to make a dressing trim for where the struts meet the side, double over the strut top to re inforce it as the roll cage will attatch here, well thats where we've got up to now, next job is to mount the engine and box and fold up the tunnels and fab the new bulkhead, getting through it now, funny theres so much more work than we first thought but hopefully you'll aggree theres alot of thought going into it, i wouldnt want it all done and be wrong or not last 5 mins. Anyway thats it for now, more to come soon.

Engine Mounting

Small update, the axle brackets for the 4 link and now the rear coil overs are all fully welded and ready to go back on the car.

Next job we've started is mounting the engine, we bolted the engine and box together and then put in its place and measured, then we made the mounts from scratch, the engine is sitting on its own now with the mounts tacked in place incase it needs moving at all when we get to another stage.

Now its sat in place we can start to fabricate the tunnel and the bulkhead, then it will start to look like a car again. The car is actually sitting on all 4 wheels now which is an achievment if its own! I'll grab some pictures when i'm next over the workshop. More to come next week hopefully if i can get a pass from the wife.

Gearbox Tunnel

I Started doing the tunnel the other night

Next job is to finish off down the sides of the tunnel then start the bulkhead.

Add a Comment

Page Last Updated: Saturday 18th of May 2024