›
› Yellow Track Mk2 Fiesta XR2 Project
Yellow Track Mk2 Fiesta XR2 Project

Author: Robert Saunders | Photographer: Robert Saunders
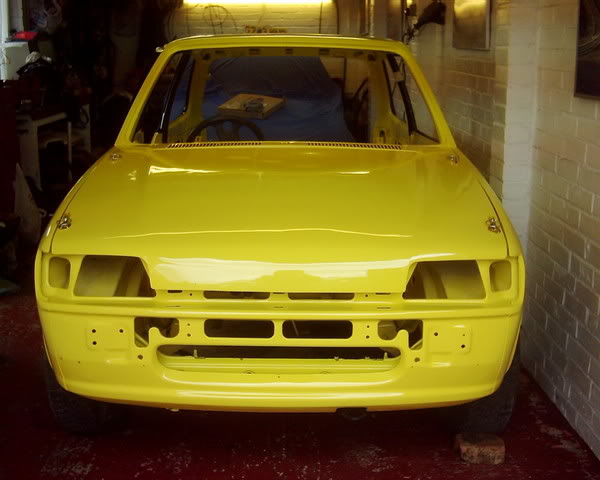
Freshly painted yellow bodyshell
5th June 2005
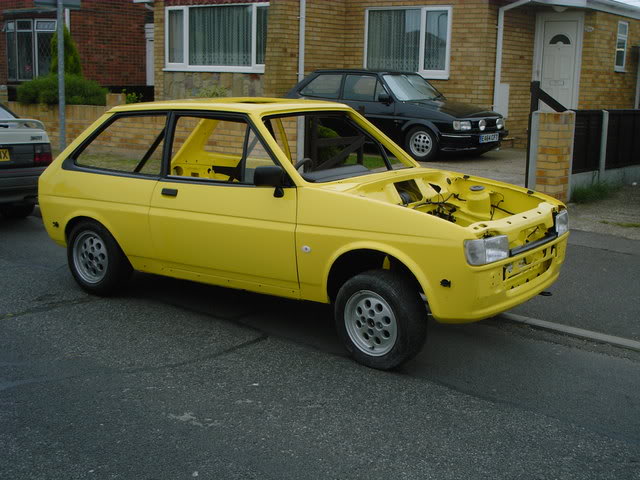
Well guys I've finally got some news to put up on my project. I had it delivered late Friday, and now the rebuild can now commence. I've managed to drag myself away from it for awhile to update my post. Now for the couple of you who were guess'ing the colour and said yellow pat yourself on the back as you were correct. Though with my clue it wasn't going to be much else really.
I've always liked yellow car's but never owned one. So as I was going for a full rebuild on this car it was a chance to get it done. I wanted something non-standard for a XR2, and I thought this may make it stand out a bit. This colour was used on the limited edition millenium range (Focus, puma, ka - 1000 of each). A bloke at work had one of the Focus's and I really liked it. The actual name of this colour is Ford Zinc yellow, but it took age's to find out. Only found out when the bodyshop contacted there supplier and asked for millenium yellow and they were told it was zinc. Even the focus and puma owners club said it was millenium, but when I double checked at my local Ford dealer they confirmed it was Zinc.
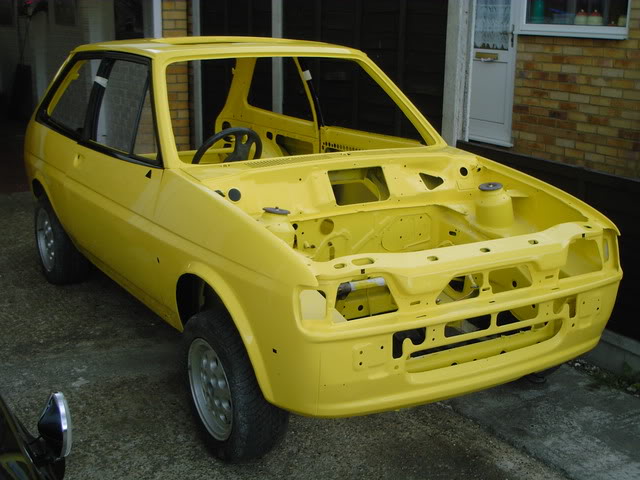
Not the best picture's of it, but since its been home it has'nt been very sunny so the picture's look a bit dark. As it was the 1st time I dragged it out the garage it rained on it. Now to say im happy with the quality of the respray is a understatment as im chuffed to bit's with it. Even the chap who sprayed it was impressed how it came out as yellow is a funny colour to spray, does'nt cover very well. The bodyshop had some trouble getting the shape of the black round the windows correct and me being fussy I was'nt having it not correct. But I think now it's spot on, it may be a bit shiny but that's due to the lacquer (5 base coat's and 3 lacquer). But the best bit is there no tape over the join, and the step between the two colours in almost nothing. They have done it like you find on multicoloured crash helmet's. Since it's been back i've given the outside two coats of polish, and the inside a light T-cut and polish. I then had to re-apply some underseal to the inner arches were some overspray had got on it, and remove all the paper/tape I had covered all the suspension in. This is the latest picture (today) after I layed the bonnet on to check out if it was sitting the correct height on the rubber buffers I have fitted underneath.
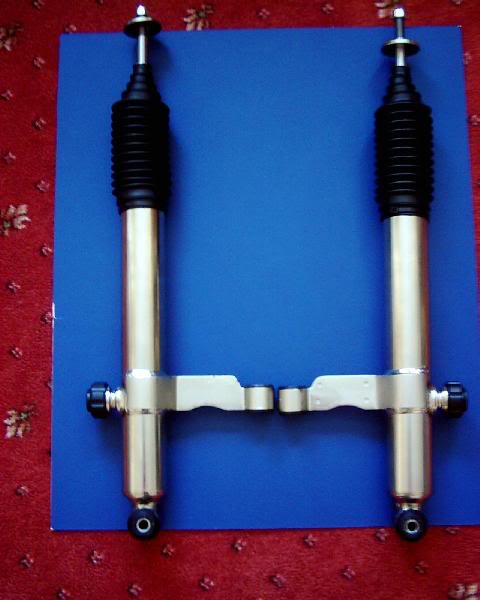
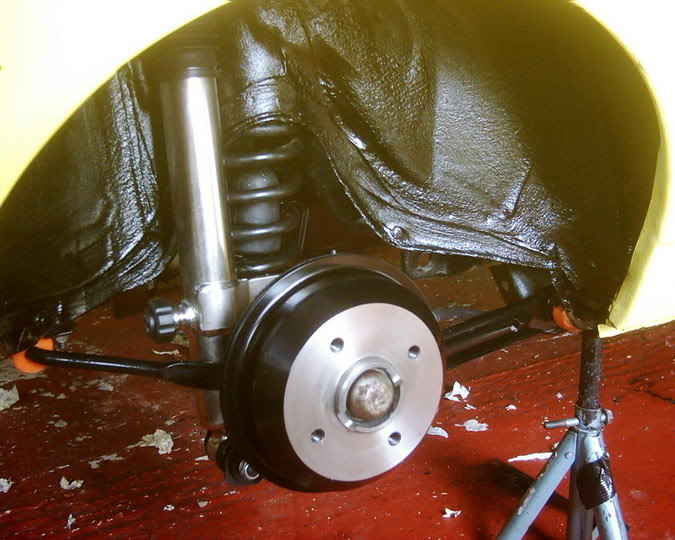
The other bits i've now started are re-assembling the drivers door (polycarb glass), fitting the loom back in, and fitting the alloy panel's onto the inside of the rear quarters which I had powder coated satin black. These are contrasting excellent against the yellow paint. I've also fitted the new suspension and brakes inside the d/s rear arch. I've got new Leda 24 position dampers with 650LB springs, deflex bushes in the harder compound, new drums, shoe's, bearings etc.
So I've got lot's to do but im going to take my time and not rush it. I wont be setting a date for when it will be ready. It will be a case of when it's done it's done.
Shell Reassembly
11th June 2005
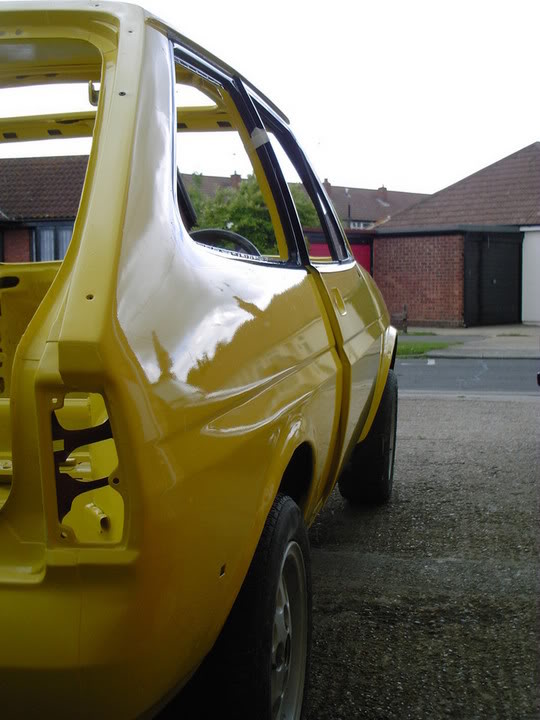
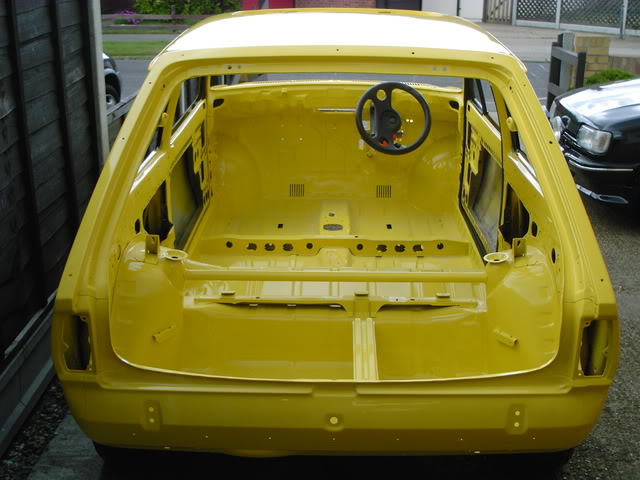
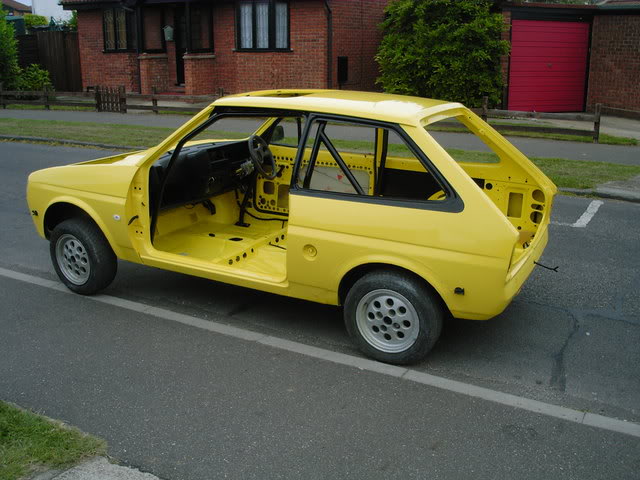
Well it's time for another update to let you lot on how the project is going. All my free time since getting it back has been spent on rebuilding it, but i've got allot done and im really pleased how it's looking. So far almost everything is going to plan except one item. I'm fitting polycarb windows. The main door piece will go up and down as the original glass. Well that was the plan, I fitted the polycarb in the door only to find that when it get's to the top of the door frame it wont go into the top groove. So out it came and after a bit of head scratching I noticed that the original glass is curved and the polycarb is flat. So when you wind the polycarb window up its trying to go up straight and so bowing outward and not sliding into the top of the frame. So I've now got to put the original glass back inthe door, there goes some of my weight saving.
These picture's were taken this morning when my mate Kev (cheers dude) came round to help me get the cage in and take these picture's. I've given the car two full coat's of polish inside and out. The reason the passenger door is not on the car is because I had to take it back to the bodyshop as I found a small run in the lacquer. This will be back monday.
INTERIOR
So far i've also fitted back in the wire'ing loom which has had most of the unused wire's now removed. I've also covered all the loom inside the car with black plastic tube'ing, and used alloy p-clips along the sill below the drivers door. Fitted in a clear overhead light back into the roof. Fitted the alloy rear quater card's I made, and had powder coated in satin black.
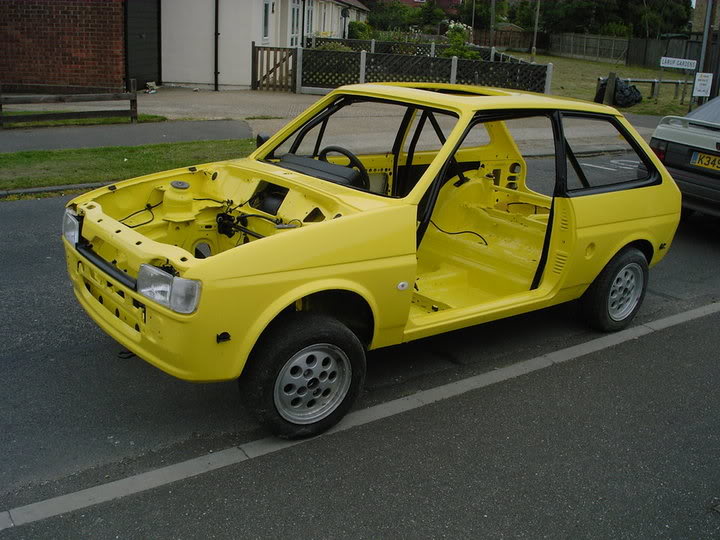
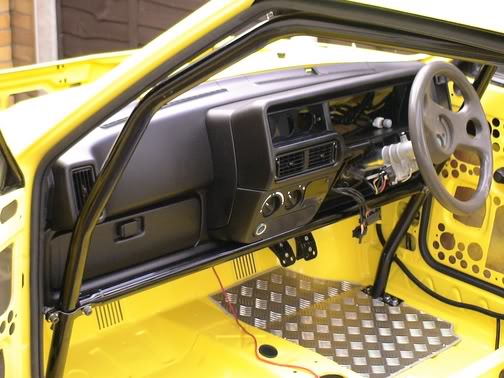
The pedals have gone back in and followed by the internal heater/blower box. Im not having a heater in the car, but the blower box is back in so I will still have the use of the fan on hot days. The dash was then fitted but with quite a few modifications to allow me to fit extra switches were needed into alloy plates fixed to the dash. The dash was also sprayed black to match the bodykit (I saw Ben1 car ages ago, and thought his black dash was cool, hope he does'nt mind me copy'ing it). I need to do some wire'ing for my custom speedo/rev clocks before I can fit them in the dash, and also into the area were the radio used to go.
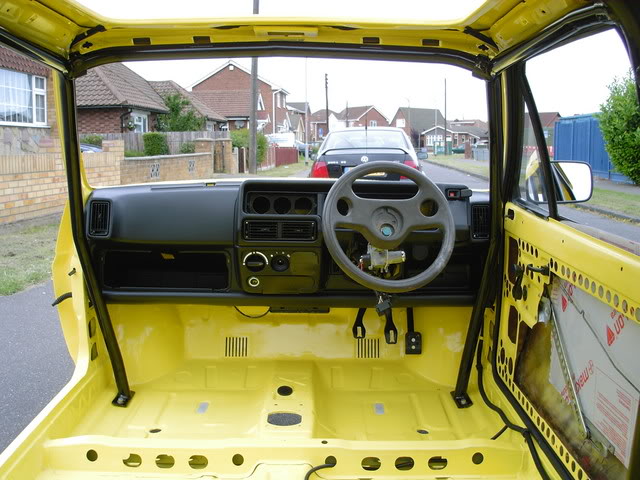
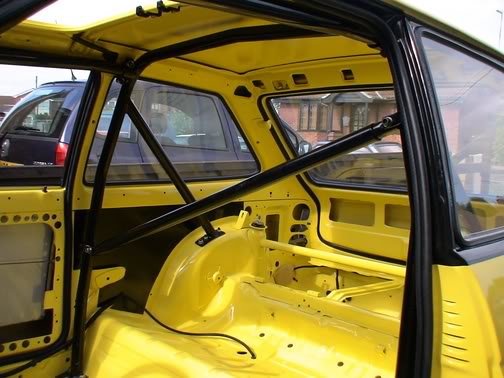
The drivers door has been built back up with the lighten'ed window mech, sprayed mirror and external handle. I've also fitted a new rubber weather seal to the door opening, amazing how much thicker a new one is and and harder it makes shuting the door. The inside of the door will be covered with a alloy sheet again in satin black. The full safety device rollcage has gone in (needs bolting in fully), the diagonal, front lower dash bar and door bars will go in at a later date. The top bar that runs along the top of the windscreen is so easy to fit without the screen in.
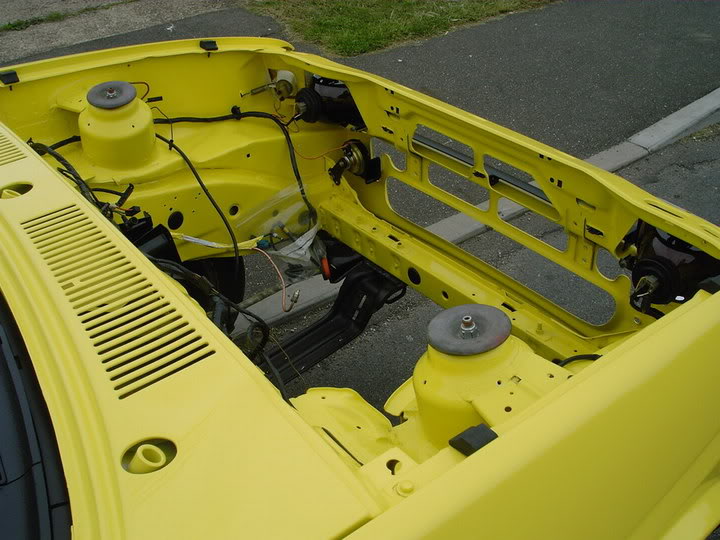
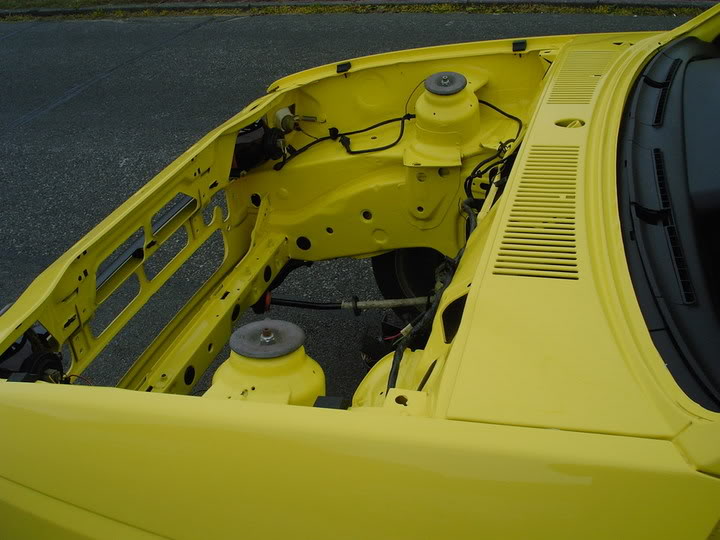
ENGINE BAY
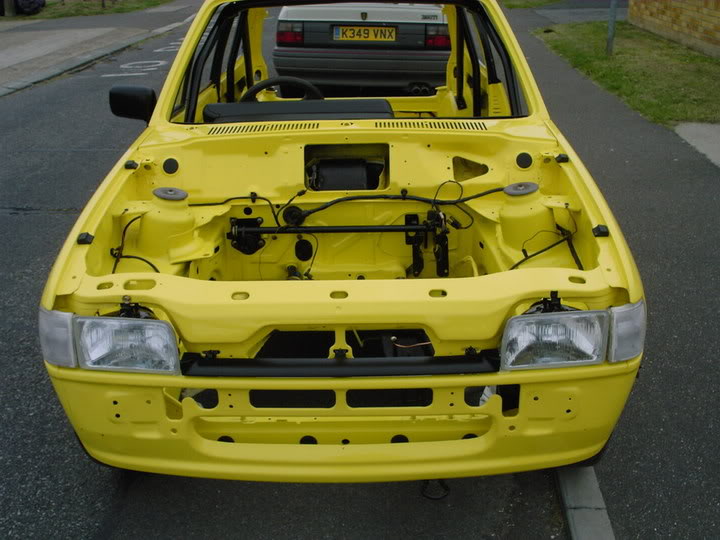
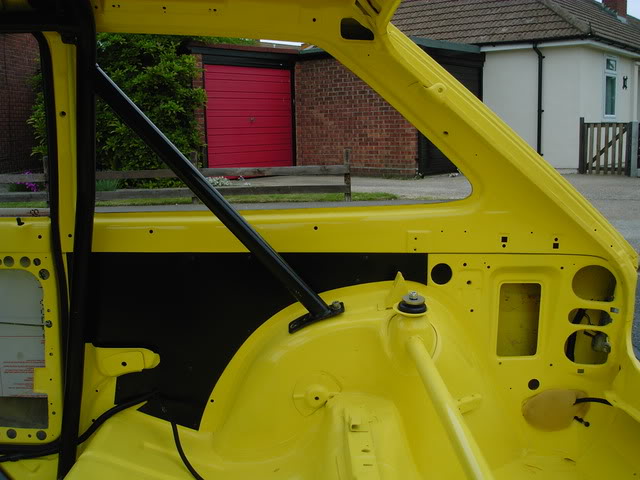
In the engine bay I've made a blanking plate up for were the hoses went thru to the interior heater rad. Fitted the early MK2 brake bar and bracket's, one new horn fitted and a pair of brand new genuine ford headlamps and pair of clear indicators. . In the engine bay im going to cover all the unused hole's with blanking plug's sprayed in the same paint as the kit. The side repeats are also clears and the painted front grille has been fitted.
That's about it for now, lot's more to do and will post up new picture's and info as I go along.
rear suspension and cage
18th June 2005
This week I've been working late's so dont get allot of time in the mornings to work on the car's. But I get home early on a friday's so yesterday I went straight out in the garage to do a few jobs. Before I new it was nearly 10.30pm :shock:. The rear suspension is now done and torqued up to spec. The rear brakes are also complete apart from the flexible braided hose's that seem to have the wrong end fittings, and wont go thru the location bracket's :? . Need to look at these again. Now to say the suspension on the back is firm would be a understatment. Basicaly it doesnt move :shock: with the race spec poly bushes's, and the leda 650Ib springs. What it will be like on the road I will only find out once it's running, but if it's to hard I can always change the springs for a lower poundage. I also started to fully bolt down the rear cage with extra floor strength'ing plates on the undersides. Will finish this next week.
Mk4 Escort brake servo setup
21st June 2005
Well here goes with the latest update. With this hot weather we have had the last few days I have'nt got as much done as I would of liked as it's just been to hot in the garage. But as today was nice and cool I spent a few hour's working on it and took these latest picture's. The first picture is just to show the anti-scuff vinyl for the top's of the sills. Purchased from Ford's the other week. They are made for the MK4 Escort's but as the doors are about the same size they fit the MK2 Fiesta's also. Made of fairly thick textured vinyl and it's just a case of pealing of the backing and sticking down were you want them.
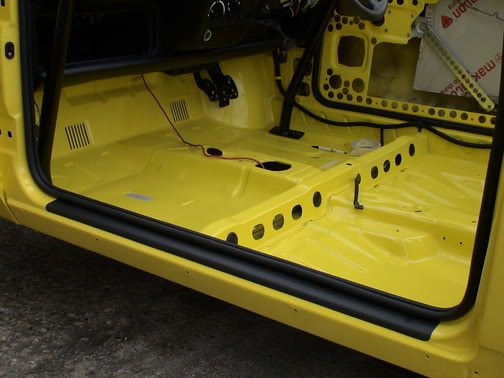
Part number if anyone is interested is 6190536 and priced at £8.33+vat each.
This picture is just to show the first bit of the bodykit back on the car. The rear end is basically done now, so I wont hopefully be going back under the rear much more. So I thought I would attach the rear valance on, and fit the fog light's.
I have also fitted the goodridge braided brake hose's to the rear. I had to file out the hole's in the brackets so they would fit, thanks speedgem, M@rtein and Bomber for the tip. Now the next selection of picture's has pleased me allot with how well they have gone on the car, and how well it look's. As I will be fitting larger disc's with Willwood 4 pots later, I had a look into what I could upgrade the servo and master cylinder with. I've got a good mate who's into MK3/4 Escort's and he hinted to me that Escort items are larger and may be made to fit.
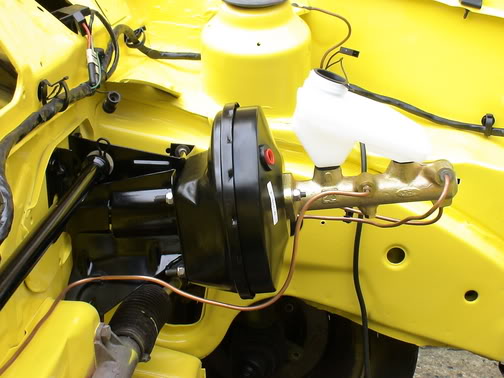
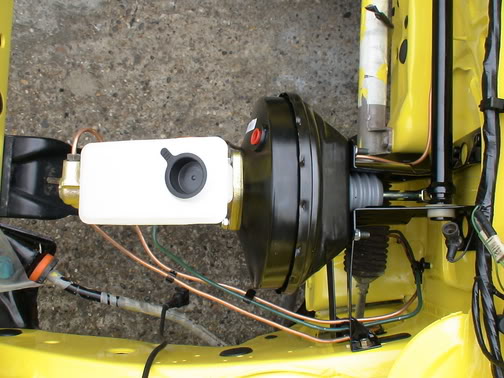
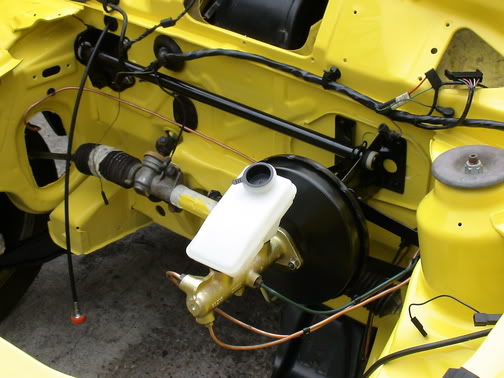
So I borrowed a few item's from him (cheer's Kev), and had a go at combination's of brake parts. The part's that i've decided and looks like it will work is as follows;
Early MK2 Fiesta brake bar setup,
MK4 Escort S2 turbo servo,
Mk4 Escort master cylinder (non abs),
MK3 RS1600i brake fluid reservoir.
To get the servo to fit as the stud spacing is larger than the Fiesta item you have to modify the two bracket's it bolt's onto. All I did was to open up the top two hole's and extend the bracket's further down to allow me to drill the bottom two stud fixing's, (welded a small plate on the bottom of each bracket). It's then a case of bolting it on and then fitting the master cylinder onto it. Three new pipes were made up, the other one only needed a slight bend to fit. With this setup you can see that the whole assembly sit's allot lower in the engine bay and at a different angle. The MK4 Escort brake fluid reservoir is at the totaly wrong angle (as can be see in picture's). Hence this is the reason that I will be using a MK3 Escort RS1600i item, but fitted round the other way. This gives a almost perfect fluid level in the container. I have a RS1600i item but it's old and dirty and am after a new one. If anyone has one or now's were I may get one please can they let me now? Now I obviously can't say yet how well this will work or the improvment over standard as the car's far from a runner yet. But I will post up the result's when I get round to finishing the brake setup. The front of the car is now up on axle stand's. The next job is to replace the standard steering rack with a quick rack, and start to build up the front suspension and brake's. Plenty to keep me busy
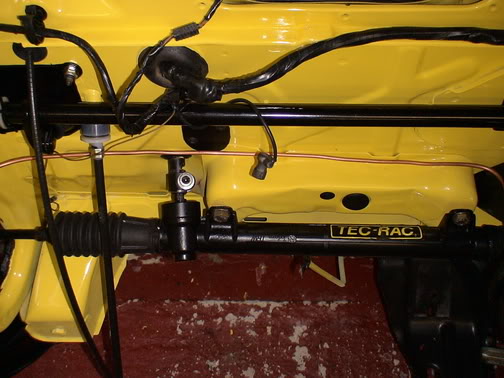
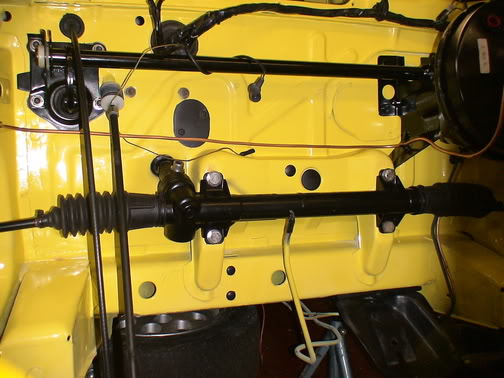
Tec-Rac Quickrack
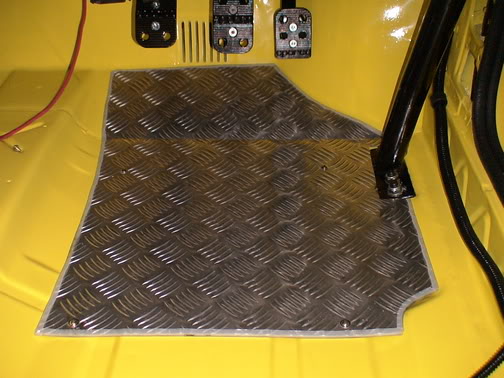
2nd July 2005
Just thought I would update you all again on a couple of item's that i've fitted to the car. 1st up is a quickrack by Tec-rac which i've given a fresh coat of satin black paint.
And I made up a floor mat out of 3mm thick alloy chequer plate which has been bolted down in place with 4, 5mm domed s/steel bolt's. Still got plenty left to make one for the passenger side also.
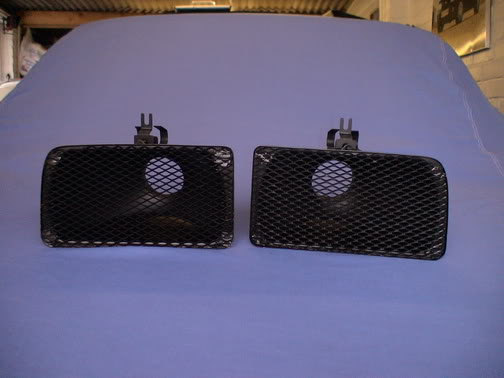
I also finished up making a pair of modified headlamp's that have had the glass removed and alloy diamond mesh fitted in place, again I have sprayed these in satin black. A hose will be connected onto the outlet on the rear which will feed cold thru to the 45 dcoe's. I will swap these over when I get to the circuit, and I may only need to use one of these.
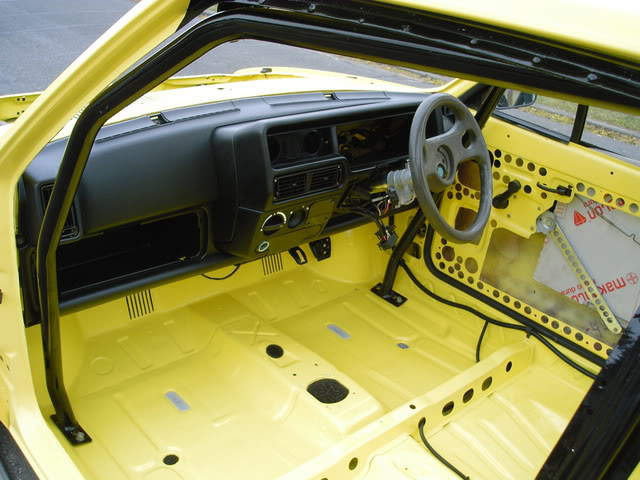
Roll cage and fibreglass bootlid fitting
9th July 2005
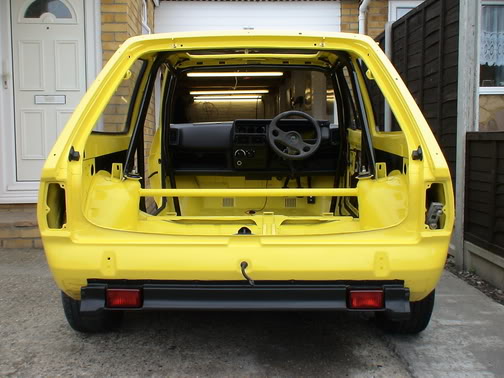
Latest updates are as follows; the safety device rollcage is now fully bolted into position. The removable rear diagonal and front bar (across bottom of dash) are in place. The door bars will be fitted once the car is finished.
The fibreglass tailgate has now been fitted in it's correct position with bonnet pin's at the top, and the original catch at the bottom (opened from inside car). I bought a new tailgate seal for the opening from ford's the other day. The number plate was made up by Chris foster, it is just the black characters stuck straight onto the tailgate so im using the yellow of the car as the background for the plate. Stuck it on myself and look's really cool.
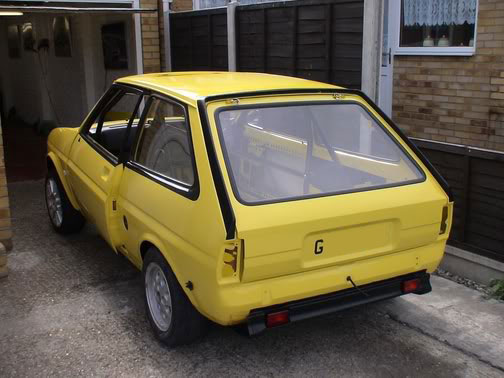
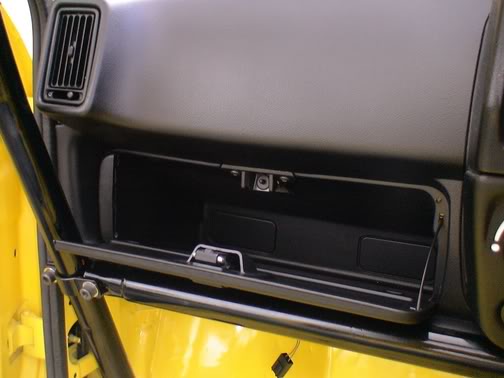
I also purchased a tube of Sikaflex yesterday, and fitted the tailgate surround in place. I used the original fixings with new small plastic grommets, and then stuck it all into position. Has gone on very well, but that sikaflex is messy stuff. Seem's to end up everywere, WD40 seem's to be the best thing to use to clean it off. Today with the help of a mate I fitted the last rear quarter, and the tailgate polycarb windows in. Bit of a job getting them in, but with a good covering of washing up liquid on the rubbers and carefully levering in the rubber and pressure they eventually popped into place. I've modified the glove box lid so that it can be used with the rollcage in place. All I did was to cut the lid so the main section still open's as normal allowing full access into the glovebox. The small section to the left that would normaly hit the cage has been stuck in place with sikaflex. With it shut you can hardly notice the join between the two sections. Im planning on fitting the engine management inside the glovebox so it wont be getting wet, out of sight, and easy for the tuners to plug there laptop into. Fitted a original mk2 glove box light in as well.
I also re-fitted the passenger side door onto the car, as it had to go back to the bodyshop for removal of a run and repainting. Gone on perfectly and the match is spot on. Have given the inside of the door a coating of waxoil and started to build it up. That's it for now but hopefully will get a few more bit's done soon.
Racetech gauges and battery tray
15th July 2005
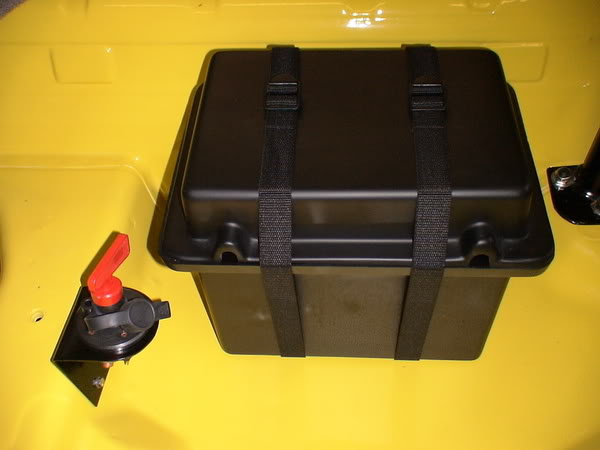
Well it's update time again. Have'nt had alot of time to spend on the car this week as I've been on a first aid course from Mon-Thur. But I've taken today of off work, and spent a few hrs doing a few jobs. I've fitted the battery tray into position next to the FIA battery cut-off switch in the rear P/S footwell. The box was red but i've sprayed it black to match the rest of the interior. It's bolted thru the floor and screws into a bracket on the underside of the floor pan. The two strap's are to hold the lid on and to allow quick axcess to the battery.
I also have started to wire in the modified XR2 clock assembly back in. This has been modified to take a RS1600i speedo, two ractech guages (oil pressure & water temp), and a Rover metro alarm light? The fuel and speedo needles have been painted zinc yellow to match the car.
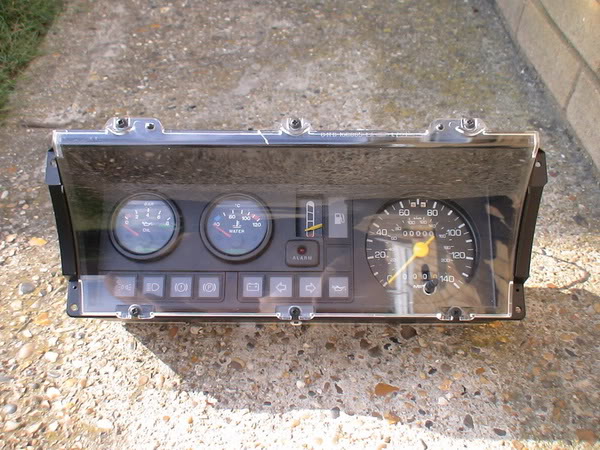
I've also got two other racetech gauges (oil temp & volt meter), and a VDO analogue clock (from a Rover) mounted in a satin black alloy plate which will be fitted into the position were the radio normally goes. Also the passenger door is 99% re-assembled and the wiring for the central locking for both door's runs thru the A-pillar's into the car now.
polycarb sunroof
18th July 2005
Today after work I got round to trying the polycarb sunroof in the car.
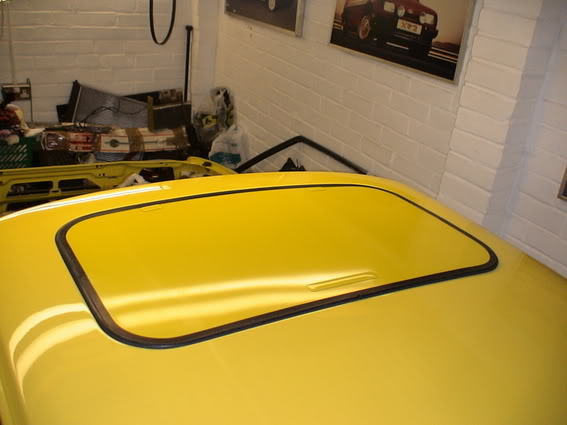
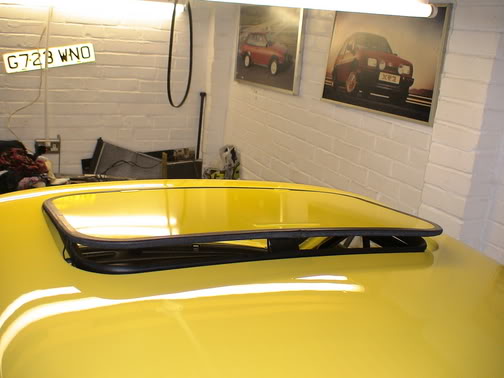
I've made it so it look's, and works just the same as the original glass sunroof. I used the glass as a template and cut out the polycarb to suit. I then fitted all the original fittings to the polycarb.
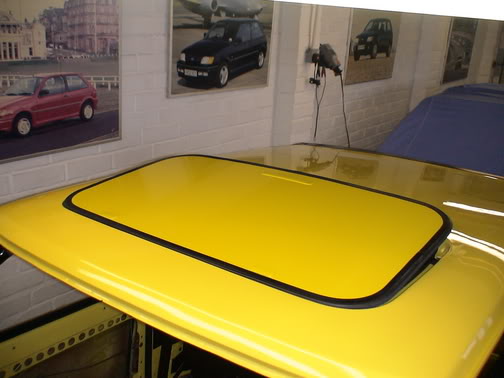
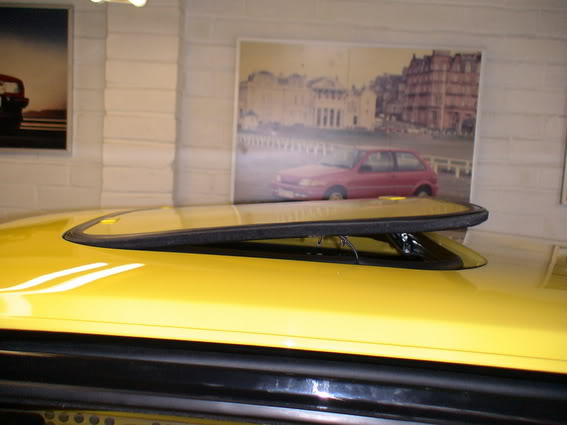
So it opens and closes just like the original. I got Chris Foster to cover it in vinyl to the nearest match to the paintwork that he could find. I then covered the smaller fitting's myself with some offcut's. I got the idea of covering the sunroof from the old Capri's that had body colour metal sunroof's. One thing I will have to watch when I get the car up and running is that being now polycarb it's not as rigid as a glass sunroof. So it may flap about when it's open, but im not planning on opening it to much. The main goal was to save weight, so I have to expect some compromise. But overall im pleased with how it look's.
Add a Comment
Page Last Updated: Saturday 18th of May 2024

